
Introduction #
One of the most commonly used interactive features of webpages is the user account system - visitors can create an account by registering, sign-in and sign-out. Craft CMS provides user management functionality out of the box with its PRO edition. Admins can add or remove users and also assign them various roles and permissions - to restrict specific user groups from visiting specific parts of the website or from performing some actions such as adding comments under blog articles.
Why this article exists #
With Craft CMS, on the front-facing side of things, there are no ready to use forms and templates. Only controllers that accept form data. This should not suprise anyone that used Craft CMS before - Craft does not restrict developers to a specific set of themes or templates, it only provides the framework to build a website. This means that developers need to build frontend user interface themselves, which can be a little overwhelming. Official documentation provides example templates, these however are a bit limited in functionality.
In this article, we will present a ready to use set of frontend user management templates and explain their inner workings. They are built with commonly used components and macros to ensure consistency. Inputs and other HTML elements have proper ARIA attributes to make code accessible.
What you will find here #
These are the pages that you will be able to use in your projects:
- Login form. Ajax-based, displayed in a modal or on a separate page.
- Registration and profile forms, automatically outputting any additional fields assigned to the user field layout.
- Password reset and set new password forms.
- Address form and list of addresses. The address form is also automatically outputting additional fields assigned to the address field layout.
- Widget showing currently signed-in user and displaying links to user management pages.
There is a GitHub repository accompanying this article, where the whole Twig code lives. You can clone it and see how these templates work in practice or copy them into your Craft CMS project.
Project structure #
Time to get to the meat of the matter.
- Each page is represented by a Twig file in the
templates/_userdirectory (all file paths will omittemplatesfrom now on). - Template code is highly modular, using reusable components - these are located in
_user/partialsdirectory. - URLs of the pages are set in the config/routes.php file.
- All page templates extend the _base.twig file which is just a simple layout existing to showcase user management pages.
Base layout file #
The _base.twig file contains basic HTML structure, simple CSS styles and link to the Bulma CSS framework file. It also includes some components which are used on every page:
- User widget file - _user/partials/user-widget.
- Flash message component - _user/partials/flash-messages.Flash messages are displayed only once and are used to show messages related to forms - errors or success notifications.
<h1>header that uses thepageTitlevariable defined in the specific pages and thecontentTwig block where specific pages inject their content.
User widget #
The user widget component requires a bit of explanation. It functions as a simple navigation, allowing us to visit user management pages.
- Craft CMS injects the
currentUservariable into the template, which contains the currently logged-in user object. If nobody is logged in, this variable is set tonull- thanks to that, we can choose which user management links should be displayed. - login and registration links will show up if the user has not logged in yet. After the user logs in, profile, addresses, and logout links will appear instead. The name of the current user will also be displayed.
- logout is not actually a page but a route built-in into Craft CMS which can be changed using the logoutPath general config variable.
Remember that since content displayed by the user widget is dynamic, you need to avoid caching it.
Login form #

First, we will describe one of the most commonly used features of user management - the login form. The login form can be used in one of two ways:
- As a separate page, possibly visited due to redirection from login-restricted content.
- Displayed within the modal which showed up because the user clicked on a button or link.
Login form page #
The login form page is available under the login address and lives in the _user/login-page.twig template file. If you want to change the login address to something else in config/routes.php file, remember to also change loginPath in the general config. This setting defines the address where users are redirected when they try to access the login restricted page and need to sign in.
When we take a look at login-page file, we will notice that it does not really output any HTML. It just includes login-form file which actually contains the form itself. This component is also used in login modals. enableAutofocus variable which is set to true and passed to login-form file makes sure that the cursor is focused automatically on the proper form field when we visit the login page. Why even add the possibility to disable autofocus? If we use our form within a modal, we don't want to focus the cursor on it when the page loads, because by default modal login form is hidden until the user decides to display it.
The login-page file also contains requireGuest Twig tag. If the user is already logged in, there is no need to see the login form, so the system will redirect the user either to the path defined in postLoginRedirect general config setting (by default it is the home page) or to login restricted page user tried to access.
Login form component #
At the beginning of the login-form file, there are Twig objects which are later used to generate inputs using Twig macros. Using them, we can easily modify form contents. Most of the properties of these objects will be used to generate HTML elements using tag Twig function. Note the label variables, userNameLabel and passwordLabel - they are set to static translation with the app param. This means that Craft CMS built-in static translations are used and our forms will be automatically translated if Craft provides a translation for a specific language.
After defining form contents attributes, we use the Twig embed tag to extend the base form template - _user/partials/base-form.twig. This file is shared by all the forms described in this article and contains a <form> tag with proper attributes (which we can modify by passing the formAttributes variable into this template) and CSRF protection functionality. base-form also contains a commented-out _user/partials/model-errors component - it displays all potential errors on top of the form. By default, it is not needed because inputs are set to display any possible errors next to a specific input. List of all errors can be still useful for debugging, so we decided to leave it like that.
Now let's look at the formContent block where we place form contents. First, we need to take care of some hidden inputs which make sure that the login form works correctly.
- actionInput will direct the form request to the proper login controller.
- redirectInput defines where the user ends up after successful login. It is set to the
craft.app.user.returnUrlvalue, which will redirect the user to the login-restricted page he or she wanted to visit (or to the address set in the postLoginRedirect general config setting, if we just visited login page directly).
Form macros #
After the hidden inputs, we output visible form contents using Twig macros. Let's take a look at _user/partials/form-macros file where macros are defined, and use formFieldInput macro as an example.
This macro accepts three parameters - an object containing HTML attributes for input, input label text, and an array containing any potential errors to be displayed under input. At the beginning of the macro, there is an array containing default CSS classes used by input. If you include class property in the object containing input attributes, this class will be overwritten.
Besides formFieldInput, there is also a macro for generating a checkbox - formFieldCheckbox and one for generating select fields - formFieldSelect. All of these macros internally use two other - formLabel for generating input labels, and formField for generating wrapper elements and displaying any potential errors. formField also adds is-required class to the field wrapper if we set the input as required. Thanks to the simple styling defined in _base.twig file, fields with this class display a red asterisk after the label (with the exception of login form - it is kinda obvious that both login and password fields are both required).
Thanks to these commonly used macros, all of our forms can be easily modified globally, for the whole website. All classes and other HTML attributes are defined in a single place.
Ajax Login #
Our login form is now fully functional - but we can still make it better by adding AJAX functionality. To do that, we used the progressive enhancement strategy - our form will work perfectly fine if Javascript is disabled and AJAX is not available. With Javascript enabled, thanks to the use of AJAX, our login form will not needlessly reload the whole page with every login attempt. In case of an unsuccessful login, it will just display an error message instead. This provides much a better user experience for users.
The AJAX functionality code is placed within the js Twig tag, wrapped with a self-executing function to prevent any variable conflicts. Let's walk through this code - if you are not interested in the technical details, you can just skip this section.
- First, we define messages which will be shown to the user. Unfortunately, such messages are not present in built-in Craft static message translations, so we use just regular static translations.
- To grab the login form DOM elements, we use the
data-login-formattribute. This is the same attribute we earlier set in the Twig variableformAttributesand passed to the_user/base-formtemplate component. - Next, we loop through the DOM element collection, to make sure AJAX functionality is applied to both the regular login form and the login form present in the modal.
- Within the
forEachloop we attach to thesubmitevent and usee.preventDefault()to prevent the regular submission of the login form. - Then we serialize form values using to
FormDataobject and create an AJAX request. - Before the request starts, we add a loading class to the submit button (the class itself is taken from
data-login-form-button-loading-classof the button) and adisabledattribute to thefieldsetelement - this will make the form disabled until the requests finish, to avoid sending multiple requests at once if user felt the sudden urge to keep clicking login button. - When the request is complete, we remove the loading class from the button and the
disabledattribute from the fieldset, parse the server response from the JSON string, and act depending on the response code:- response code 200, login successful - the success message is put into the submit button. We either redirect the user to the URL returned by the server or just refresh the page if no redirect address was provided.
- response code 400, login unsuccessful - we display an error message returned by the server using the regular
alert()function. - response code 500, server error - we display a generic error message using the regular
alert()function. - response code 0, connection error - we display a network error message using the regular
alert()function.
Login modal #

The login form can be also displayed in a modal, using the Modal component plugin. Make sure you have it installed if you want to use it that way.
The login modal is placed in _user/partials/user-widget file, so it is available on every page. The modal plugin works by providing a modal template that can have modal content passed to it using the embed Twig tag. We just pass the login form there, with the enableAutofocus variable set to false. We also namespace the id and for attributes (using apply Twig function to apply namespace filter) of elements inside, to prevent conflicts and focusing on wrong input when someone clicks label.
The modal is opened by clicking on the regular login link in the user widget which has data-a11y-dialog-show attribute set to login-modal - the same as modalId variable passed to the modal component. To make sure that the link does not redirect us to the login page just after opening modal, we attach a click event to it and run preventDefault() function. Keep in mind however that we can still open the login page in a new tab, using a middle mouse button.
We also make sure that the autofocus functionality works after opening the modal - we use the modal component plugin event show for that. After opening the modal we just focus on input that has data-enable-autofocus attribute present.
Resetting and setting a new password #
Craft CMS has a simple mechanism for resetting account passwords:
- User enters the email address assigned to the account.
- Message with reset link is sent to this email.
- When the user visits the link from the message, he or she is redirected to the form where a new password can be set.
As we can see, this requires two forms - reset password form and set password form.
Reset password form #

This form is available under reset-password address. Remember that you can set the general config variable setPasswordRequestPath to this URI so that Craft will redirect .well-known/change-password requests to the proper page.
The password reset form is pretty simple - it has just one input, where users can enter their email.
Template files used:
Set password form #
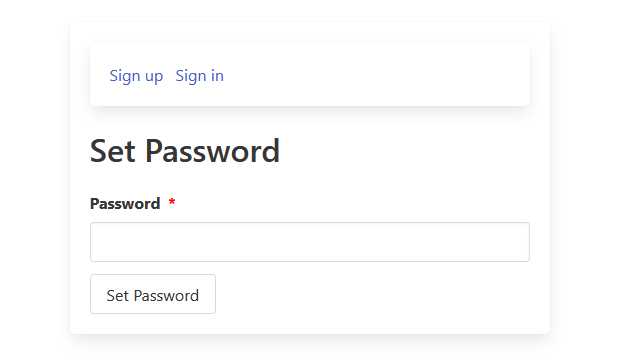
Users will visit this form after clicking the password reset link delivered by email. While Craft provides its own form for that functionality, we can replace it with our own. URL of set password form is set in general config under setPasswordPath to the default setpassword value. If no such page exists, Craft will use the default form - that's why we set this URI in routes.php to form template.
With only one visible input, the form itself is pretty simple. There are also two additional hidden inputs - code and id, which are filled by Twig variables injected automatically into a template based on the URL parameters of the password reset link. Note that if you reset the password of the admin user, Craft will still redirect you to the default built-in form, even if you have a custom form defined.
Template files used:
Dealing with users #
Registration and profile forms are kinda similar - both deal with user objects. The registration form creates new ones and the profile form edits existing users.
Both of these forms inject user variable into the template in the situation when we submit the form, but the validation fails. When that happens, the form is populated with invalid values to inspect and correct them. When form is displayed before submitting, instead user variable we use:
- Registration form - empty user object, created with create function.
- Profile form -
currentUservariable, containing currently logged-in user.
User fields #
Both profile and registration forms share most of their fields - that's why these fields are placed into the separate reusable component, user-fields.
The most interesting functionality of user-fields file is outputting the custom fields assigned to the user field layout. We retrieve them using the user.getFieldLayout().customFields, loop through them, and output each using the custom-fields template component. Inside that file, depending on the field type, field widgets are outputted using macros from form-macros template file. As for now, text, lightswitch, and dropdown fields are supported - the rest of the fields are ignored.
Note that this component shows the username field only if useEmailAsUsername setting is set to false - if we use email as username, there is no need for a separate username field.
Registration form #
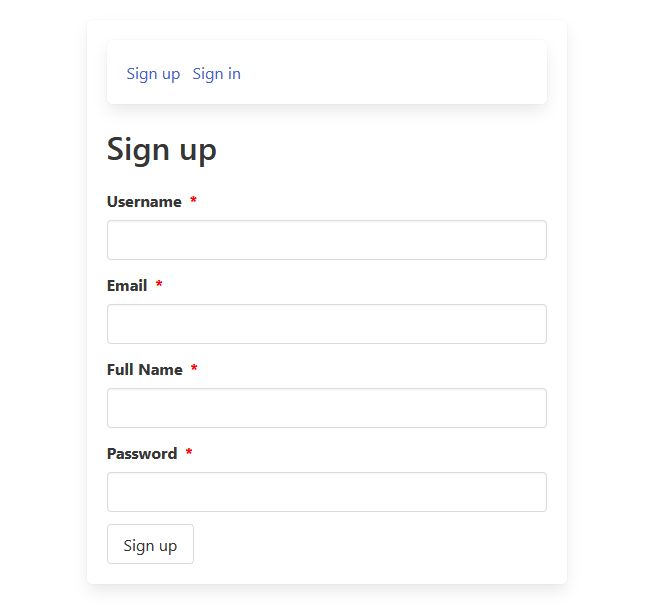
If you want to allow users to register, remember that you first need to enable it in the "Users" section of the control panel settings, with the "Allow public registration" setting. Craft CMS can verify the email address before the account is activated, using a verification email message. If this functionality is enabled in the settings, a flash message shown after the user submits the registration form will still be "User registered". We need to overwrite it with a proper message asking the user to confirm the account using email. To do that, we used successMessageInput function.
Template files used:
Profile form #
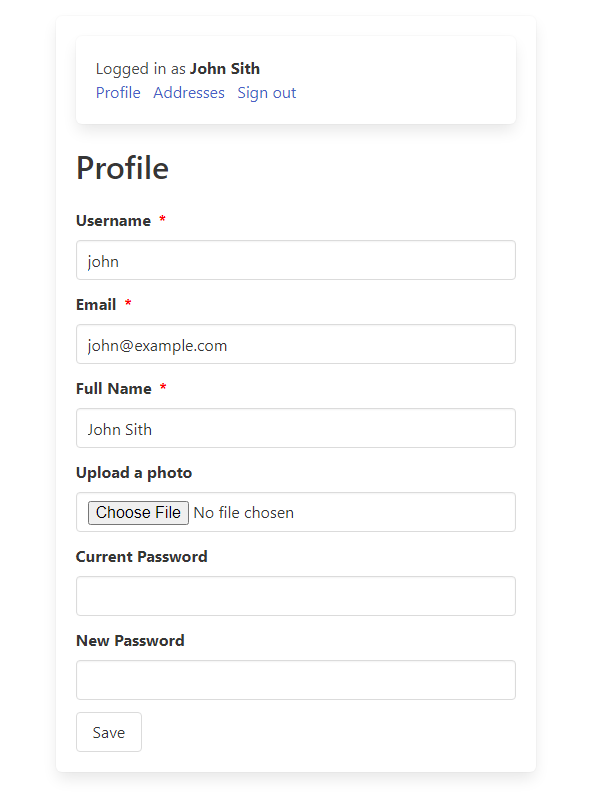
Profile form uses the same fields as the registration form, with a few additions:
userIdhidden input, with the value set to current user id. Thanks to it, Craft knows which user to edit.- Photo field, which is only displayed if there is an asset source set for the user's photos in Craft CMS settings (otherwise, there would be nowhere to upload photos).
- If a photo is already uploaded, it is displayed within the form, along with a checkbox that can be selected to remove the existing photo when the form is submitted.
- New password field, used to change password. Remember that when the password is changed, users also need to fill current password field as a security measure. Same with changing the email address - otherwise, an error will appear when the form is submitted.
Template files used:
Addresses #
Addresses are the element types introduced in Craft CMS 4. They are assigned to the users and can have their own field layout composed of native fields (pre-existing, specific only to address) as well as regular Craft fields.
To manage addresses on the frontend, we need to have three pages:
- Addresses list
- New address page
- Edit address page
Address list #

The address list displays all addresses belonging to the currently logged in user. It also has a link to the new address page. Each address on the list has:
- Address title.
- Link to edit address page.
- Deletion form. Visually, this form shows only the delete button, but it also contains actionInput set to
users/delete-addresscontroller action. To tell Craft which address should be deleted, there is alsoaddressIdhidden input.
Template files used:
New address page #
Just like with profile and registration pages, the new address page and edit address page use the common template component for displaying its contents, address-fields.
Within this file, we loop through address field layout items. These consist of both regular Craft fields which are just outputted using custom-fields template, or native address fields. These are outputted manually within the address-fields template component, using Twig macros.
Note that a single native field is sometimes represented by multiple inputs. For example, Latitude/Longitude field is represented by two separate inputs in the form - one for latitude and one for longitude. Depending on the option selected within Country select widget, Craft CMS may validate Postal code and State inputs as either required or not. For example, for the USA these inputs are required. That's why this form uses required HTML attribute for both of these inputs by default.
Template files used:
Edit address page #
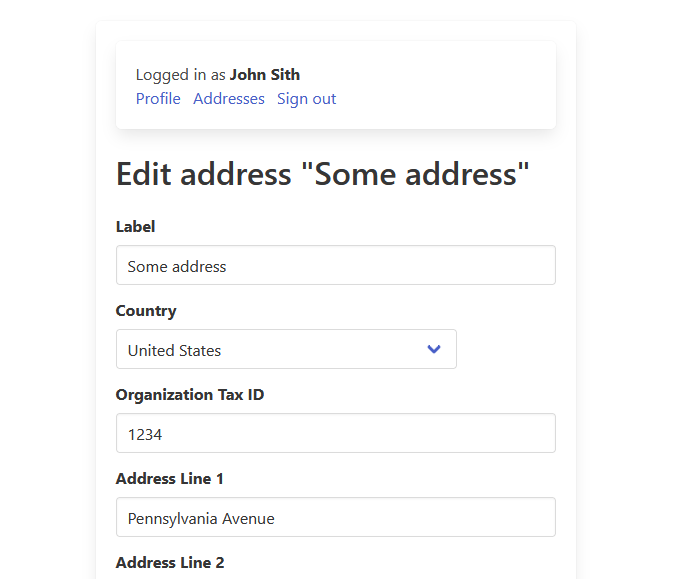
Users can have multiple addresses assigned. Since Craft does not provide frontend URLs for addresses, the route for a specific address page needs to use addressId token. Using this ID, the template code performs the element query and grabs a specific address to populate the address form. If no address with a specific ID is found, the template just throws 404 error. Using the queried address object, we also define pageTitle containing the address title.
Template files used:
Closing thoughts #
With this set of templates, your Craft CMS website will support user accounts - but the fun does not stop there. Twig components and macros we described in this article can easily be repurposed for other things. For example - for building Entry form. And even if you don't need any forms - our code is a good example of how to build Twig templates in a modular and robust way.
The research for this article was supported by fortrabbit and is originally posted with the fortrabbit blog.