Component overview #
Our search autocomplete component is pretty uncomplicated. This however, makes it universal and easy to use in any Craft project. Based on typed in text, search hints will be created and appended to search input. These hints are composed of text representing suggested entry, with a phrase that user initially typed highlighted.
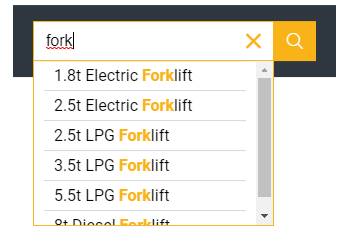
Here's an example of search form with search hints displayed:
Component structure #
Let's analyze how autocomplete functionality that we are building works, step by step.
- User starts typing into search input.
- JS code performs AJAX query to backend endpoint. Query carries phrase that user started typing in.
- Based on the phrase, endpoint performs search in database and returns results.
- JS code renders search hints from received results and appends them to search input.
- After clicking on one of the hints, action can be performed - for example, visiting URL of clicked element.
For our endpoint, we will use Element API plugin. It will return results in JSON format. It's first party plugin (maintained by Craft team), so we can be 100% sure that it will seamlessly work with Craft and there won't be any problems with its maintenance.
For frontend code - making AJAX requests and rendering search hints - we will use jQuery autocomplete. It simple library, doing just what we need it to do.
Element API endpoint #
First, we need to create endpoint using Element API. We need to define it in config/element-api.php file.
<?php
use craft\elements\Entry;

return [
    'endpoints' => [
        'search.json' => function() {

        // settings
        $section_handle = 'articles';
        $phrase = Craft::$app->request->getParam('query');

        $criteria = [
            'section' => $section_handle,
            'search' => 'title:'.$phrase,
        ];

            return [
                'elementType' => Entry::class,
                'criteria' => $criteria,
                'paginate' => false,
                'transformer' => function(craft\elements\Entry $entry) {

                return [
                    'title' => $entry->title,
                    'url' => $entry->url,
                ];
            },

            ];
        },
    ]
];
Let's briefly analyze endpoint structure.
search.json is endpoint name. Endpoint itself will be available under address that will look like yourdomain.com/search.json.
$criteria is an array that contains parameters of our database query. It uses same ElementCriteriaModel rules that are used for creating queries in Twig templates.
In our case, we are stating that we want to get elements from section with "articles" handle (change it to whatever section you need), and search through them using string received from GET parameter named query. If we wanted to perform such query in template it would look like this:
{{ craft.entries.section('articles').search(craft.app.request.getParam('query')) }}
In return part of endpoint, we define a couple of important paramaters.
We set paginate to false - jQuery autocomplete is unable to handle paginated results. elementType must be set to Entry::class - note that while setting up $criteria, we didn't specify if query will be performed through entries, categories or another element - we do it there.
Finally, there is transformer. It defines how single object in returned data is structured. In our case, we just return title and url of entries. This is how returned JSON data will look like:
{
   "suggestions":[
      {
         "title":"Blog post 1",
         "url":"http://domain.com/blogpost1"
      },
      {
         "title":"Blog post 2",
         "url":"http://domain.com/blogpost2"
      },
      {
         "title":"Blog post 3",
         "url":"http://domain.com/blogpost3"
      },
   ]
}
Frontend side of things #
Now that we set up endpoint, we need to write some javascript code that will communicate with it. First, let's add jQuery autocomplete files to our website (along with jQuery library itself of course). After that, we just need to set up our search form.
<form action="">
    <div class="js-search-wrapper">
        <input type="text" class="js-search-input" name="search">
    </div>
</form>

{% js %}
$('.js-search-input').autocomplete({
    serviceUrl: '{{url('search.json')}}',
    appendTo: $('.js-search-wrapper'),
    onSelect: function (suggestion) {
        window.location.href = suggestion.url
    },
    transformResult: function(response){
        return {
            suggestions: $.map(JSON.parse(response).data, function(dataItem) {
                return { value: dataItem.title, url: dataItem.url };
            })
        };
    }
  });
{% endjs %}
The first thing worth noting is that I have written JS code inline - within Craft {% js %} tag. This is vue-like approach - I put my JS code right next to HTML and Twig, structuring my code like vue single file components. Thanks to this approach, my Twig components are highly self-contained and can be easily transfered to other projects.
Another advantage of such approach is that I can actually use Twig variables and functions within JS code - in example above I used Craft url() Twig function in serviceUrl JS parameter. So, '{{url('search.json')}}' was rendered as 'http://mydomain.com/search.json'.
jQuery autocomplete #
We create autocomplete instance by attaching it to search input. Autocomplete requires two basic settings - serviceUrl that defines URL of endpoint and appendTo that defines DOM element that search hints will be appended to.
Before jQuery autocomplete can consume data returned from endpoint, we need to transform it into the proper format using transformResult event. jQuery autocomplete requires key of results object to be called suggestions while element API by default returns data inside object called data. Name of single element needs to be called value instead of title - this can be fixed using jQuery $.map method.
By default, clicking on search hint will just put suggested text (its value attribute) into input. I modified this behavior using onSelect event. Clicking on hint will actually load page associated with it. That's why each object returned by endpoint has url parameter - it is not required by plugin itself, but we needed it to make hints behave like links.
Styling #
jQuery autocomplete comes with its own basic CSS stylesheet. I modified it a little, stripping it to a bare minimum and changing pixels to rems.
.autocomplete-suggestions {
    box-sizing: border-box;
    border: 1px solid #999;
    background: #FFF;
    cursor: default;
    overflow: auto;
}

.autocomplete-suggestion {
    padding: 0.1rem 0.3rem;
    white-space: nowrap;
    overflow: hidden;
}

.autocomplete-no-suggestion {
    padding: 0.1rem 0.3rem;
}

.autocomplete-selected {
    background: #F0F0F0;
}

.autocomplete-suggestions strong {
    font-weight: bold;
    color: #000;
}

.autocomplete-group {
    padding: 0.1rem 0.3rem;
    font-weight: bold;
    font-size: 1rem;
    color: #000;
    display: block;
    border-bottom: 1px solid #000;
}
More advanced solution #
If you want to make your search autocomplete more advanced (for example - by displaying thumbnails along with entry titles) you will need to write frontend code yourself, instead of using jQuery plugin.
I urge you to visit this article on nystudio blog. It also deals with search autocomplete functionality based on Element API, but compared to my fairly simple solution, nystudio's one is more advanced - it uses Vue JS framework to manually render search hints.