Creating email templates is a task that can quickly erode the sanity of developer. To make messages display correctly on a vast plethora of email clients, you need to be aware of all their idiosyncrasies and use techniques that are long forgotten in the world of frontend development - for example, table-based layouts.
That's why it is often preferable to use premade templates - I have decided to use Postmark Transactional Email Templates as a base for universal email Template for Craft CMS. It has a minimalistic design and is responsive - when displayed on a mobile device, it will fit a screen. I utilize it mainly for contact form submissions and any other notification messages.
Email template structure #
Since template source code contains tons of clutter, I will not paste full code into this article - you need to visit this github gist to obtain it. Here's how example message made with universal email template looks like:
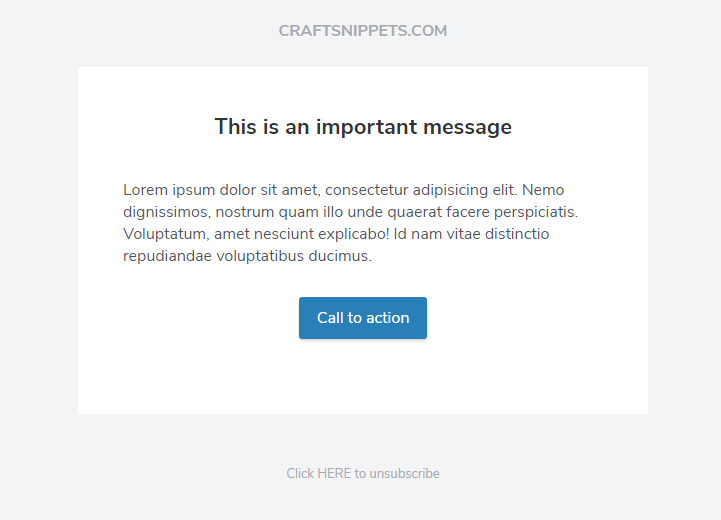
The template is composed of three main parts - header, content box and footer. These parts are available as blocks that your message can inject content into. There is also preview block - there, you can put the text that will show up in the inbox of most email clients, below subject.
The content area of the message contains three elements - text, title and call to action button, which of course can be used more than one time if needed. While text is just text, title and button are Twig macros defined at beginning of email template. Here's how to create a message that looks like one on the screenshot above:
{% set buttonColor = '#2980b9' %}
{% import 'email_layout' as m %}
{% extends 'email_layout' %}

{% block preview %}
Urgent message, be sure to open it.
{% endblock %}

{% block header %}
CRAFTSNIPPETS.COM
{% endblock %}

{% block footer %}
Click HERE to unsubscribe
{% endblock %}

{% block content %}
{{m.title('This is important message')}}

Lorem ipsum dolor sit amet, consectetur adipisicing elit. Nemo dignissimos, nostrum quam illo unde quaerat facere perspiciatis. Voluptatum, amet nesciunt explicabo! Id nam vitae distinctio repudiandae voluptatibus ducimus.

{{m.button('Call to action', 'http://website.com', buttonColor)}}
{% endblock %}
As you can see, message template code looks pretty much like regular entry template, which uses extends to inject content into blocks of base template. It's worth noting that first we declared buttonColor variable (if we didnt, button color would default to red). We did that before using extends, so thanks to template interhirence this variable will be injected into base template - which has CSS declaration of button color:
.button {
  background-color: {{buttonColor}};
  border-top: 10px solid {{buttonColor}};
  border-right: 18px solid {{buttonColor}};
  border-bottom: 10px solid {{buttonColor}};
  border-left: 18px solid {{buttonColor}};
}
This variable is also passed directly to button macro - macros are isolated from the variable scope and need all of their variables passed into them.
But why do we actually need to pass this variable into a macro? It's because all CSS styles are placed in regular <style> tag in base template AND later inlined - added to every HTML element inside style attribute. This means that every styling used by email template appears in multiple places. Such a solution is used because some email clients prefer their styles inlined, and some in separate <style> tag.
Going further #
If you want to create your own email template, you can use MJML to make your job easier. It's HTML-like syntax which is later compiled into ready to use HTML code.
If you would rather work with HTML directly, Style inliner Craft plugin might be useful to you. Thanks to it, you will be able to declare CSS styles in single <style> tag - the plugin will automatically inline them in all HTML elements of the template. So, no need to declare every CSS in multiple places.